
05 May Texture Tuesday – The Art of Pysankarstvo

This spring I kept seeing eggs in integral patterns, full of color and texture, and I was instantly drawn to them, wanting to learn how to paint them. A tad late to purchase kits for my teen girls (I knew how much they loved to do detail artwork), I discovered in my online research that The Jordan-Bachman Pioneer Farm was offering a Pysanka class on April 26th. Perfect, I thought to myself! I’ll sign up the girls for the workshop (and I’ll take it too) and we’ll all learn how to paint these incredibly intricate gorgeous eggs.
Well, it’s not as simple as that:
- Pysanka, is not painting, it’s writing,
- The workshop was 4 hours long and VERY challenging, and
- You really have to have patience and a steady hand to be successful.
But boy, was it fun!
We all stuck with it and I learned this amazing art that is generations old that I want to share with you. Our teacher, Martha Schreffler was wonderful and gave us a brief intro, lots of papers full of resources and a glossary, and then we dug in and worked feverishly to create two painted eggs.
Martha’s notes state that: “Pysanka (pronounced PIH-sahn-kah) is a Ukrainian term used to describe an egg decorated using the wax resist (batik) method. It applies to eggs written either with a stylus, or using drop-pull (pinhead).” (Note: Pysankarstvo is the art/craft of writing pysanky. Pysanky is the plural of pysanka, not the name of the craft).
To learn more about this beautiful art form, here are some informative websites:
Pysanky.info, a site by Luba who does it as a hobby,
Lorrie Popow videos, You Tube videos that also show you the technique,
And there’s even a Facebook Group you can join HERE, which is a great place to ask questions, learn more, and get inspiring ideas.
For those in Austin, the next classes at Pioneer Farms are May 24th and June 28th. You can register HERE.
So for this week’s #TextureTuesday, please follow along and I will take you through a general step-by-step process, with photos, of The Art of Pysankarstvo. I hope you enjoy learning about it as much as I did. There’s tons of history behind these elaborate eggs, so be sure to check out the websites, as I am no expert. I’ve only had one class, but eager to try it again.
Till next time, enjoy the rain in Austin! XO PG
(Note: I was not compensated for this post. All images and comments are my own unless quoted. Also, please subscribe to #TextureTuesdays on the blog HERE. I’ll be interviewing artists, interior designers and more throughout the year. On occasion, I will write a Thursday blog post, but not every week.)

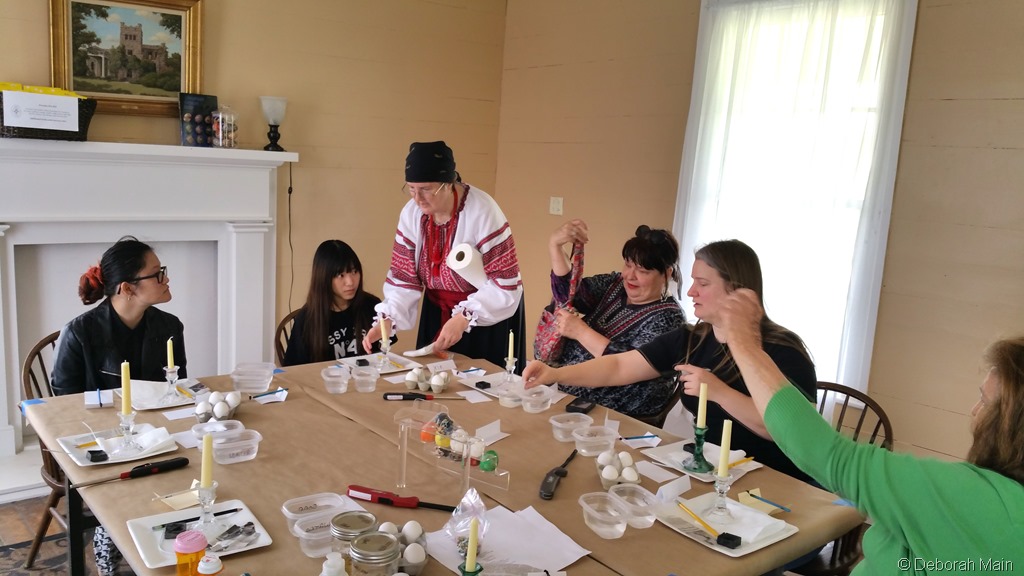
Here we go! Two additional students came along, so we had to split the tables in order for everyone to have a “station”.
Below are the tools at each station:
- An egg carton with two eggs per person,
- Two small plastic containers filled with water,
- A strip of newspaper,
- A plain white strip of paper,
- A pencil,
- A long candle lighter,
- One stylus, and
- A plate with a candle and a black square of wax.

To write on the egg, you have to have a stylus like below. The blue handle ones have a thicker stroke. The white handle ones are a much finer point. To understand this tool, one must first realize that, like Batik, it is the art of applying wax to the egg through this tool and then dying the egg, then applying more wax, dying again and repeating that creates the color and pattern on the egg.
The color of your egg when you’re applying the wax will be that color underneath that wax line or section. The spout (I’m sure that’s not the correct term) is kind of like a cup. The stylus below, is kind of upside down, the pointy part is where the wax comes out onto the egg (thus it’s writing, like with a caligraphy pen kind of), and the cup part (as you’ll see in images below) is where you scoop up the wax and heat it over the candle.
Note: I’m not going to do TOO much explaining because it’s really best to take a class or workshop as it is quite an in-depth learning curve.


Above is Martha, the teacher, who is a noted Pysanky artist, talking to the class about the stylus and how to use it. She has a white one in her hand. Her assistant, LaDawna, is holding a rack of completed Pysanky.

I highly recommend the class, or an online instructional video, especially if you’re like me and it takes you a while to grasp a complex technique. I have to do something in order to learn it effectively. This post is by no means a lesson on Pysanky, as I am no teacher of this detailed technique. In fact, there’s a whole page just on these first two steps alone!! But I’ll try and summarize it as best I can, so bear with me. The photos show it best.
Step 1: Find the top and the bottom of the egg by rubbing it on the newspaper.
Step 2: Lightly draw a short vertical line on one side of the egg and then draw lines through the short lines.
Step 3: Draw the pattern.
Basically you’re getting the center set on the egg, and dividing it into four quadrants, so your design and pattern are symmetrical and even throughout the whole egg. The middle image below clearly demonstrates how difficult it was for me to make a circle on the egg surface. My circle is NOT even round!! I found the drawing part challenging, but that might be because I don’t draw. If you have drawing skills (which both my girls do) you might find this easier than I did.

Below is one of the students, my daughter, carefully completing the drawing.

Step 4: Light the candle and begin to wax a portion of the design.

As you can see from the above image, we’ve drawn the pattern on the egg. Now, here I am, tongue et al, trying to light the candle to get ready to wax!! The teacher gave us several drawings. We all worked on one together and the diagram you see above breaks out the drawing into stages, the stages that we will dye and wax. Then for the second egg we were able to choose a design from samples she has or create our own.

Step 5: After lighting the candle you heat the cup of the stylus and begin to wax part of the drawing.
The dark square in the above image is the wax. Not sure if you can see it, but the blue stylus is turned the other way so the cup is up and the point is down. You heat that cup so the wax melts and then you write ON the egg on the lines that you drew. Making sense yet? (It’s a very complex procedure, so if my explanation isn’t doing it for you my feelings will not be hurt, please jump on over to one of the videos and hear a professional explain it.)
It took me quite a while to get the hang of how much wax to use and how hot to get it. Sometime hardly any wax would come out, then all of a sudden it would gush a big puddle. I think it’s important to get it hot enough for a consistent flow.


Above is the first part of our drawing and waxing.This is where I learned first hand, that it helps to have a steady drawing hand (no pun intended). Then it goes into the first dye, orange.

This is the dying table above that Martha’s assistant took charge of so we could focus on learning the drawing technique. I was very thankful we didn’t have to dip our hands into orange, read, green, blue and black dye!
Step 6: Dye the egg one color. For this first egg, our first color was orange.


Step 7: After it’s dyed orange, we do some more writing with wax, as you can see in the above left image and below.

Step 8: You have to wash off, with soap, the orange color before you can go on to the next color. That’s the other two images above. One tub is with the soap and the other one is to rinse it well.
So far now, we have part of the design that will be in white, and part in orange.

Step 9: You repeat the writing and the dyeing until you’ve got the whole egg completed.
We then went through several more colors, hustling and bustling up to the table to give Martha’s assistant (LaDawna, who was very helpful!) our eggs to put in the next color, until the final one, black. We did not have time to Shelac our eggs after the dyeing, but that’s what makes them shiny.

It’s now time to burn the wax off so you can see all the colors you dyed the egg and your beautiful design!
Step 10: You hold the egg carefully NEXT to the flame, not in it. Because if you put it IN the flame it could leave marks on your design. You’ll see the wax shine. That’s when you take it away from the flame for the next step.

Step 11: Then you take a paper towel and gently rub the wax off while it’s melted. This is a very delicate process and you have to be sure you don’t rub too hard and crack the egg you just worked so diligently on. (Only a couple women broke their eggs in the process….I was VERY thankful I was not one of them).

Step 12: The Big Reveal!! You get to see your design and all the colors! That’s mine below. I had a difficult time with the detail drawing, but it turned out okay for my first try.

That’s my finished egg above. And below, is the one of the student next to me. You can see how drawing is a skill that is helpful to creating crisp, clean lines in your design.


Okay, this is a design break here! I could not help but notice the incredible antique light fixtures above the dyeing table. The house the class was in was very, very old and reminded me of my childhood home that was built in the early 1800’s.


Step 13: The scariest of all the steps, drilling a hole into your egg that you’ve just spent a couple hours writing and dyeing! But you’ve got to get ready for “Blowing Your Egg”!

The above pic shows my daughter drilling the hole in the bottom of the egg with a sharp, screw like end.
Step 14: “Blowing Your Egg” Below, Martha uses a suction cup that has a long pin that goes in the hole to get all that good stuff out. Warning: If you don’t like eggs, this may be the step you want to avoid, or have someone else do for you.

Here are the intricate step by step instructions for “Blowing Your Egg”:

Step 15: Then you carefully place your finished egg between these pins on a board so it can drain a bit.
This image above shows the first design Martha taught us in the forefront, and then in the middle row is some of our original designs. Mine, on the left is red, black and yellow, and since my hand was not that steady, I decided to do a geometric design. The center one is also a geometric design by one of the students, using one of the pattern choices from the pysanky designs below. And the right egg is the black and white one created by my daughter.

Above are the design options we could select for our 2nd egg, or we could make our own.
Below is my daughter working on her 2nd egg design that she sketched out on the paper that was provided. She dyed it to be black and white only.

Here’s another student working on writing on her 2nd egg.


Above, you can see why my daughter chose a black and white design just by her fashionable B & W houndstooth pants!!
Below are some more great close ups of two other students and their great writing examples!


And I conclude with my two girls’ eggs and mine, all in one carton, ready to safely carry home. The eggs are stuffed with paper towel (that we have to change out periodically at home) to absorb the remaining moisture until they’re dry.
And the final step, if you want to make them as shiny as the ones in the glass jar below, is to Shelac them.


Here’s a book and a kit you can purchase on line to learn more about the Ukraianian history and designs for the “The Art of Pysankarstvo”.


Fini!! A half a dozen Pysanky all done and ready for viewing!! It was an adventure for sure, but so fun to learn this art with my girls. I hope this post inspires you to check it out too!

Sandy Alvarez
Posted at 10:41h, 07 MayOh my goodness! That was involved-but beautiful results!
Deborah Main
Posted at 00:12h, 12 MayYou got that right, Sandy! It was a little bit overwhelming, but yes, definitely worth it. Thank you for reading my long post. I’m still working on making them shorter. Let me know when I get it right 🙂